What task is needed to build a sequence generator for an EIB integration?
Put Sequence Generator Rule Configuration
Create ID Definition/Sequence Generator
Edit Tenant Setup - Integrations
Configure Integration Sequence Generator Service
In Workday, a sequence generator is used to create unique, sequential identifiers for integration processes, such as Enterprise Interface Builders (EIBs). These identifiers are often needed to ensure data uniqueness or to meet external system requirements for tracking records. The question asks specifically about building a sequence generator for an EIB integration, so we need to identify the correct task based on Workday’s integration configuration framework.
Understanding Sequence Generators in Workday
A sequence generator in Workday generates sequential numbers or IDs based on predefined rules, such as starting number, increment, and format. These are commonly used in integrations to create unique identifiers for outbound or inbound data, ensuring consistency and compliance with external system requirements. For EIB integrations, sequence generators are typically configured as part of the integration setup to handle data sequencing or identifier generation.
Analyzing the Options
Let’s evaluate each option to determine which task is used to build a sequence generator for an EIB integration:
A. Put Sequence Generator Rule Configuration
Description: This option suggests configuring rules for a sequence generator, but " Put Sequence Generator Rule Configuration " is not a standard Workday task name or functionality. Workday uses specific nomenclature like " Create ID Definition/Sequence Generator " for sequence generator setup. This option seems vague or incorrect, as it doesn’t align with Workday’s documented tasks for sequence generators.
Why Not Correct?: It’s not a recognized Workday task, and sequence generator configuration is typically handled through a specific setup process, not a " put " or rule-based configuration in this context.
B. Create ID Definition/Sequence Generator
Description: This is a standard Workday task used to create and configure sequence generators. In Workday, you navigate to the " Create ID Definition/Sequence Generator " task under the Integrations or Setup domain to define a sequence generator. This task allows you to specify the starting number, increment, format (e.g., numeric, alphanumeric), and scope (e.g., tenant-wide or integration-specific). For EIB integrations, this task is used to generate unique IDs or sequences for data records.
Why Correct?: This task directly aligns with Workday’s documentation for setting up sequence generators, as outlined in integration guides. It’s the standard method for building a sequence generator for use in EIBs or other integrations.
C. Edit Tenant Setup - Integrations
Description: This task involves modifying broader tenant-level integration settings, such as enabling services, configuring security, or adjusting integration parameters. While sequence generators might be used within integrations, this task is too high-level and does not specifically address creating or configuring a sequence generator.
Why Not Correct?: It’s not granular enough for sequence generator setup; it focuses on tenant-wide integration configurations rather than the specific creation of a sequence generator.
D. Configure Integration Sequence Generator Service
Description: This option suggests configuring a service specifically for sequence generation within an integration. However, Workday does not use a task named " Configure Integration Sequence Generator Service. " Sequence generators are typically set up as ID definitions, not as standalone services. This option appears to be a misnomer or non-standard terminology.
Why Not Correct?: It’s not a recognized Workday task, and sequence generators are configured via " Create ID Definition/Sequence Generator, " not as a service configuration.
Conclusion
Based on Workday’s integration framework and documentation, the correct task for building a sequence generator for an EIB integration is B. Create ID Definition/Sequence Generator. This task allows you to define and configure the sequence generator with the necessary parameters (e.g., starting value, increment, format) for use in EIBs. This is a standard practice for ensuring unique identifiers in integrations, as described in Workday’s Pro Integrations training materials.
Surprising Insight
It’s interesting to note that Workday’s sequence generators are highly flexible, allowing customization for various use cases, such as generating employee IDs, transaction numbers, or integration-specific sequences. The simplicity of the " Create ID Definition/Sequence Generator " task makes it accessible even for non-technical users, which aligns with Workday’s no-code integration philosophy.
Key Citations
Workday Pro Integrations Study Guide, Module 3: EIB Configuration
Workday Integration Cloud Connect: Sequence Generators
Workday EIB and Sequence Generator Overview
Configuring Workday Integrations: ID Definitions
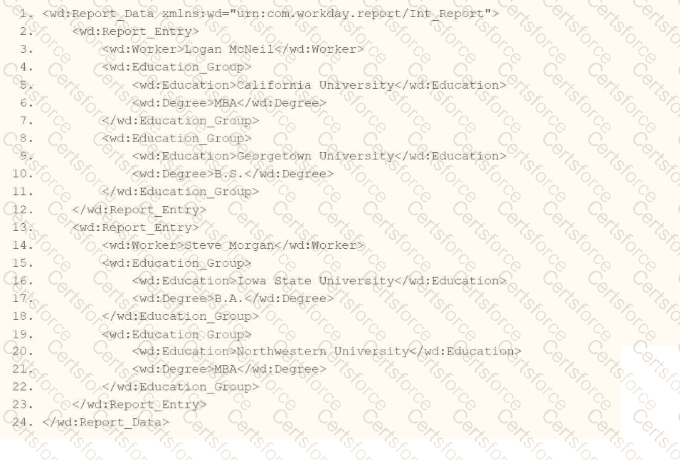
Refer to the following XML and example transformed output to answer the question below.
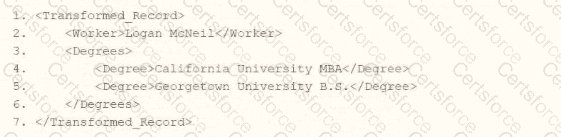
Example transformed wd:Report_Entry output;
What is the XSLT syntax tor a template that matches on wd: Educationj3roup to produce the degree data in the above Transformed_Record example?

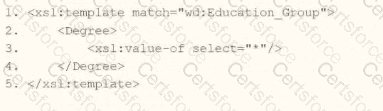
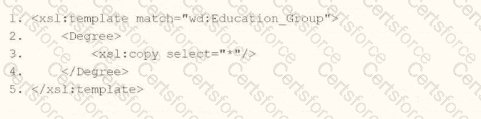
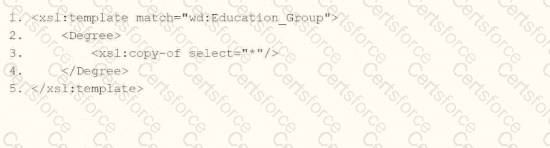
In Workday integrations, XSLT is used to transform XML data, such as the output from a web service-enabled report or EIB, into a desired format for third-party systems. In this scenario, you need to create an XSLT template that matches the wd:Education_Group element in the provided XML and transforms it to produce the degree data in the format shown in the Transformed_Record example. The goal is to output each degree (e.g., " California University MBA " and " Georgetown University B.S. " ) as a < Degree > element within a < Degrees > parent element.
Here’s why option A is correct:
Template Matching: The < xsl:template match= " wd:Education_Group " > correctly targets the wd:Education_Group element in the XML, which contains multiple wd:Education elements, each with a wd:Degree child, as shown in the XML snippet (e.g., < wd:Education > California University < /wd:Education > < wd:Degree > MBA < /wd:Degree > ).
Transformation Logic:
< Degree > creates the outer < Degree > element for each education group, matching the structure in the Transformed_Record example (e.g., < Degree > California University MBA < /Degree > ).
< xsl:copy > < xsl:value-of select= " * " / > < /xsl:copy > copies the content of the child elements (wd:Education and wd:Degree) and concatenates their values into a single string. The select= " * " targets all child elements of wd:Education_Group, and xsl:value-of outputs their text content (e.g., " California University " and " MBA " become " California University MBA " ).
This approach ensures that each wd:Education_Group is transformed into a single < Degree > element with the combined text of the wd:Education and wd:Degree values, matching the example output.
Context and Output: The template operates on each wd:Education_Group, producing the nested structure shown in the Transformed_Record (e.g., < Degrees > < Degree > California University MBA < /Degree > < Degree > Georgetown University B.S. < /Degree > < /Degrees > ), assuming a parent template or additional logic wraps the < Degree > elements in < Degrees > .
Why not the other options?
B.
xml
WrapCopy
< xsl:template match= " wd:Education_Group " >
< Degree >
< xsl:value-of select= " * " / >
< /Degree >
< /xsl:template >
This uses < xsl:value-of select= " * " / > without < xsl:copy > , which outputs the concatenated text of all child elements but does not preserve any XML structure or formatting. It would produce plain text (e.g., " California UniversityMBACalifornia UniversityB.S. " ) without the proper < Degree > tags, failing to match the structured output in the example.
C.
xml
WrapCopy
< xsl:template match= " wd:Education_Group " >
< Degree >
< xsl:copy select= " * " / >
< /Degree >
< /xsl:template >
This uses < xsl:copy select= " * " / > , but < xsl:copy > does not take a select attribute—it simply copies the current node. This would result in an invalid XSLT syntax and fail to produce the desired output, making it incorrect.
D.
xml
WrapCopy
< xsl:template match= " wd:Education_Group " >
< Degree >
< xsl:copy-of select= " * " / >
< /Degree >
< /xsl:template >
This uses < xsl:copy-of select= " * " / > , which copies all child nodes (e.g., wd:Education and wd:Degree) as-is, including their element structure, resulting in output like < Degree > < wd:Education > California University < /wd:Education > < wd:Degree > MBA < /wd:Degree > < /Degree > . This does not match the flattened, concatenated text format in the Transformed_Record example (e.g., < Degree > California University MBA < /Degree > ), making it incorrect.
To implement this in XSLT for a Workday integration:
Use the template from option A to match wd:Education_Group, apply < xsl:copy > < xsl:value-of select= " * " / > < /xsl:copy > to concatenate and output the wd:Education and wd:Degree values as a single < Degree > element. This ensures the transformation aligns with the Transformed_Record example, producing the required format for the integration output.
Workday Pro Integrations Study Guide: Section on " XSLT Transformations for Workday Integrations " – Details the use of < xsl:template > , < xsl:copy > , and < xsl:value-of > for transforming XML data, including handling grouped elements like wd:Education_Group.
Workday EIB and Web Services Guide: Chapter on " XML and XSLT for Report Data " – Explains the structure of Workday XML (e.g., wd:Education_Group, wd:Education, wd:Degree) and how to use XSLT to transform education data into a flattened format.
Workday Reporting and Analytics Guide: Section on " Web Service-Enabled Reports " – Covers integrating report outputs with XSLT for transformations, including examples of concatenating and restructuring data for third-party systems.
A calculated field used as a field override in a Connector is not appearing in the output. Assuming the field has a value, what could cause this to occur?
Access not provided to calculated field data source.
Access not provided to all fields in the calculated field.
Access not provided to Connector calculated field web service.
Access not provided to all instances of calculated field.
This question addresses a troubleshooting scenario in Workday Pro Integrations, where a calculated field used as a field override in a Connector does not appear in the output, despite having a value. Let’s analyze the potential causes and evaluate each option.
Understanding Calculated Fields and Connectors in Workday
Calculated Fields: In Workday, calculated fields are custom fields created using Workday’s expression language to derive values based on other fields, conditions, or functions. They are often used in reports, integrations, and business processes to transform or aggregate data. Calculated fields can reference other fields (data sources) and require appropriate security permissions to access those underlying fields.
Field Override in Connectors: In a Core Connector or other integration system, a field override allows you to replace or supplement a default field with a custom value, such as a calculated field. This is configured in the integration’s mapping or transformation steps, ensuring the output includes the desired data. However, for the calculated field to appear in the output, it must be accessible, have a valid value, and be properly configured in the integration.
Issue: Calculated Field Not Appearing in Output: If the calculated field has a value but doesn’t appear in the Connector’s output, the issue likely relates to security, configuration, or access restrictions. The question assumes the field has a value, so we focus on permissions or setup errors rather than data issues.
Evaluating Each Option
Let’s assess each option based on Workday’s integration and security model:
Option A: Access not provided to calculated field data source.
Analysis: This is partially related but incorrect as the primary cause. Calculated fields often rely on underlying data sources (e.g., worker data, organization data) to compute their values. If access to the data source is restricted, the calculated field might not compute correctly or appear in the output. However, the question specifies the field has a value, implying the data source is accessible. The more specific issue is likely access to the individual fields within the calculated field’s expression, not just the broader data source.
Why It Doesn’t Fit: While data source access is important, it’s too general here. The calculated field’s value exists, suggesting the data source is accessible, but the problem lies in finer-grained permissions for the fields used in the calculation.
Option B: Access not provided to all fields in the calculated field.
Analysis: This is correct. Calculated fields in Workday are expressions that reference one or more fields (e.g., Worker_ID + Position_Title). For the calculated field to be used in a Connector’s output, the ISU (via its ISSG) must have access to all fields referenced in the calculation. If any field lacks " Get " or " View " permission in the relevant domain (e.g., Worker Data), the calculated field won’t appear in the output, even if it has a value. This is a common security issue in integrations, as ISSGs must be configured with domain access for every field involved.
Why It Fits: Workday’s security model requires granular permissions. For example, if a calculated field combines Worker_Name and Hire_Date, the ISU needs access to both fields’ domains. If Hire_Date is restricted, the calculated field fails to output, even with a value. This aligns with the scenario and is a frequent troubleshooting point in Workday Pro Integrations.
Option C: Access not provided to Connector calculated field web service.
Analysis: This is incorrect. There isn’t a specific " Connector calculated field web service " in Workday. Calculated fields are part of the integration’s configuration, not a separate web service. The web service operation used by the Connector (e.g., Get_Workers) must have permissions, but this relates to the overall integration, not the calculated field specifically. The issue here is field-level access, not a web service restriction.
Why It Doesn’t Fit: This option misinterprets Workday’s architecture. Calculated fields are configured within the integration, not as standalone web services, making this irrelevant to the problem.
Option D: Access not provided to all instances of calculated field.
Analysis: This is incorrect. The concept of " instances " typically applies to data records (e.g., all worker records), not calculated fields themselves. Calculated fields are expressions, not data instances, so there’s no need for " instance-level " access. The issue is about field-level permissions within the calculated field’s expression, not instances of the field. This option misunderstands Workday’s security model for calculated fields.
Why It Doesn’t Fit: Calculated fields don’t have " instances " requiring separate access; they depend on the fields they reference, making this option inaccurate.
Final Verification
The correct answer is Option B, as the calculated field’s absence in the output is likely due to the ISU lacking access to all fields referenced in the calculated field’s expression. For example, if the calculated field in a Core Connector: Worker Data combines Worker_ID and Department_Name, the ISSG must have " Get " access to both the Worker Data and Organization Data domains. If Department_Name is restricted, the calculated field won’t output, even with a value. This is a common security configuration issue in Workday integrations, addressed by reviewing and adjusting ISSG domain permissions.
This aligns with Workday’s security model, where granular permissions are required for all data elements, as seen in Questions 26 and 28. The assumption that the field has a value rules out data or configuration errors, focusing on security as the cause.
Supporting Documentation
The reasoning is based on:
Workday Community documentation on calculated fields, security domains, and integration mappings.
Tutorials on configuring Connectors and troubleshooting, such as Workday Advanced Studio Tutorial, highlighting field access issues.
Integration security guides from partners (e.g., NetIQ, Microsoft Learn, Reco.ai) detailing ISSG permissions for fields in calculated expressions.
Community discussions on Reddit and Workday forums on calculated field troubleshooting (r/workday on Reddit).
What XSL component is required to execute valid transformation instructions in the XLST code?
xsl:template
xsl:apply-template
xsl:call-template
xsl:output
The required XSLT component is xsl:template. XSLT transformations are driven by templates, which define the transformation rules that apply to matched XML nodes. A template can match a source element or be called by name, and it contains the instructions that produce the transformed output. xsl:apply-template is not the correct element name; the correct XSLT instruction is xsl:apply-templates, and it is used to invoke template processing on selected nodes. xsl:call-template calls a named template but does not by itself define the rule being executed. xsl:output controls serialization settings such as output method or encoding. For valid transformation logic, the core executable rule container is xsl:template.
================
Refer to the scenario. You are configuring a Core Connector: Worker integration to extract worker demographic and contact information. The integration uses the Data Initialization Service (DIS) and must include worker fields such as name, address, and a calculated field identifying workers eligible for a phone allowance.
During a Full File test run, the output file is missing all address-related information, even though the Address Line Data, Municipality, Region, and Postal Code fields were configured in the Configure Integration Field Attributes step. You also confirmed that the Worker Personal Data Section is marked as Include in Output.
What should you do to resolve this issue?
Mark each address field in the Address Data subfolder as Required in Configure Integration Field Attributes.
Enable the Address Data subfolder in Configure Integration Field Attributes and then reselect the address fields.
Enable the Worker Personal Data Section Fields integration service within the Configure Integration Services step.
Within the Configure Integration Services task, select the Enable All Services checkbox.
This question concerns a Full File test of a Core Connector: Worker integration where address fields (Address Line, Municipality, Region, Postal Code) are missing from the output, despite being configured in Configure Integration Field Attributes. Additionally, the Worker Personal Data Section is marked as Include in Output.
This issue commonly stems from a missed Enablement of the Address Data subfolder, which acts as a container for the address-related fields. Even if individual fields are selected, they will not appear in the output if their parent subfolder is not enabled.
From the Workday Pro Integrations documentation:
“Each subfolder in the integration field hierarchy, such as Address Data under Worker Personal Data, must be explicitly enabled. If the subfolder itself is not enabled, the fields within it, even if marked as Required or Included, will not be rendered in the output.”
To resolve this:
Navigate to Configure Integration Field Attributes
Expand the Worker Personal Data > Address Data subfolder
Enable the subfolder
Then reselect the required address fields
Incorrect Options Explained:
A. Mark each address field as RequiredMarking fields as Required is only effective if the parent subfolder is enabled. Without enabling the subfolder, fields remain excluded.
C. Enable the Worker Personal Data Section Fields integration serviceThis pertains to service execution, not field visibility. The issue lies in field hierarchy and inclusion, not the service configuration.
D. Enable All Services in Configure Integration ServicesThis enables all integration services but does not impact field inclusion or subfolder visibility within field attribute configuration.
Refer to the following scenario to answer the question below.
You are configuring a Core Connector: Worker integration to send data to a new external compliance and certification tracking vendor. You have begun to configure the connector with the Data Initialization Service (DIS) enabled. Your goal is to extract worker qualification data, but the vendor has three specific requirements:
The file must only include Active workers who are in the “Clinical Staff” Job Family.
The vendor has specified that for each worker’s Education data, they only want to receive the Institution Name, Institution Type and Degree.
The vendor requires a custom “License ID” that must combine the Certification Name and Issuing State, for example, “RN-CA”. A Calculated Field that provides this custom “License ID” already exists in the tenant.
The License ID calculated field is not displaying in the output however you have confirmed the calculated field exists and is functional in the tenant.
What configuration step should you complete to include this field in the output?
Use the Configure Integration Field Attributes related action to select Include in Output for the calculated field.
Create a Custom Field Override service and then configure the integration field overrides to add the calculated field.
Leverage the Configure Integration Maps related action to create an Integration Map.
Use the Configure Integration Field Overrides related action and add the calculated field.
A calculated field that already exists in the tenant is not automatically emitted in a Core Connector output. For this requirement, the connector must be extended so the custom value becomes available and is then placed into the outbound structure. Creating a Custom Field Override service makes the calculated License ID available for the connector output, and the integration field override then adds that calculated field into the file. Integration Maps are used to translate values, such as converting one code set to another; they do not add a new calculated field. Field Attributes mainly control delivered field inclusion and field behavior. Since the requirement is to add a custom calculated output value, the custom field override service plus field override configuration is the correct workflow.
================
What is the task used to upload a new XSLT file for a pre-existing document transformation integration system?
Edit Integration Attachment
Edit Integration Attachment Service
Edit XSLT Attachment Transformation
Edit Integration Service Attachment
In Workday, when you need to upload a new XSLT (Extensible Stylesheet Language Transformations) file to modify or replace an existing transformation within a pre-existing document transformation integration system, the specific task required is " Edit XSLT Attachment Transformation. " This task allows users to update the XSLT file that governs how XML data is transformed within the integration system without creating an entirely new transformation object.
Here’s why this is the correct answer:
Workday’s integration systems often rely on XSLT to transform XML data into the desired format for downstream systems or processes. When an XSLT file has already been associated with an integration system (e.g., as part of an Enterprise Interface Builder (EIB) or a Document Transformation Connector), updating it requires accessing the existing transformation configuration.
The " Edit XSLT Attachment Transformation " task enables users to upload a revised version of the XSLT file. This action replaces the previous file while maintaining the integration system’s configuration, ensuring continuity without necessitating additional changes to the system itself.
This task is distinct from other options because it specifically targets the transformation logic (XSLT) rather than broader integration components or services.
Let’s examine why the other options are incorrect:
A. Edit Integration Attachment: This task is used to manage generic attachments associated with an integration, such as input files or supplementary documents, but it does not specifically address XSLT transformations. It lacks the precision required for updating transformation logic.
B. Edit Integration Attachment Service: This is not a recognized task in Workday’s integration framework. It appears to be a conflation of terms and does not align with the documented processes for managing XSLT files.
D. Edit Integration Service Attachment: While this might suggest modifying an attachment related to an integration service, it is not the correct task for handling XSLT files in a document transformation context. Workday documentation consistently points to " Edit XSLT Attachment Transformation " for this purpose.
The process typically involves:
Navigating to the integration system in Workday (e.g., via the " Search " bar by entering the integration system name).
Using the related actions menu to select " Integration System " > " Edit XSLT Attachment Transformation. "
Uploading the new XSLT file, which must comply with Workday’s size limitations (e.g., 30 MB for attachments) and be properly formatted.
Saving the changes, which updates the transformation logic without altering other integration configurations.
This approach ensures that transformations remain aligned with business requirements, such as reformatting data for compatibility with external systems, while leveraging Workday’s secure and efficient integration tools.
Workday Pro Integrations Study Guide: " Configure Integration System - TRANSFORMATION " section, which details the use of XSLT files in document transformations and the associated tasks.
Workday Documentation: " Enterprise Interface Builder (EIB) " and " Document Transformation Connector " sections, where the " Edit XSLT Attachment Transformation " task is outlined for updating XSLT files.
Workday Community: Guidance on managing XSLT attachments, confirming this task as the standard method for updating pre-existing transformations.
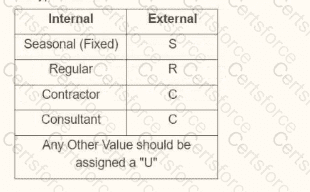
You are creating an outbound connector using the Core Connector: Job Postings template. The vendor has provided the following specification for worker subtype values:
The vendor has also requested that any output file have the following format " CC_Job_Postings_dd-mm-yy_#.xml " . Where the dd is the current day at runtime, mm is the current month at runtime, yy is the last two digits of the current year at runtime, and # is the current value of the sequencer at runtime. What configuration step(s) must you complete to meet the vender requirements?
• Enable the Sequence Generator Field Attribute • Configure the Sequence Generator • Configure the Worker Sub Type Integration Mapping leaving the default value blank
• Enable the Integration Mapping Field Attribute • Configure the Worker Sub Type Integration Mapping leaving the default value blank • Configure the Sequence Generator
• Enable the Integration Mapping Integration Service • Configure the Worker Sub Type Integration Mapping and include a default value of " U " • Configure the Sequence Generator
• Enable the Sequence Generator Integration Service • Configure the Sequence Generator • Configure the Worker Sub Type Integration Mapping and include a default value of " U "
This question involves configuring an outbound connector using the Core Connector: Job Postings template in Workday Pro Integrations. We need to meet two specific vendor requirements:
Map worker subtype values according to the provided table (e.g., Seasonal (Fixed) = " S " , Regular = " R " , Contractor = " C " , Consultant = " C " , and any other value = " U " ).
Format the output file name as " CC_Job_Postings_dd-mm-yy_#.xml " , where:
" dd " is the current day at runtime,
" mm " is the current month at runtime,
" yy " is the last two digits of the current year at runtime,
" # " is the current value of the sequencer at runtime.
Let’s break down the requirements and evaluate each option to determine the correct configuration steps.
Understanding the Requirements
1. Worker Subtype Mapping
The vendor provides a table for worker subtype values:
Internal Seasonal (Fixed) maps to " S "
Internal Regular maps to " R "
Internal Contractor maps to " C "
Internal Consultant maps to " C "
Any other value should be assigned " U "
In Workday, worker subtypes are typically part of the worker data, and for integrations, we use integration mappings to transform these values into the format required by the vendor. The integration mapping allows us to define how internal Workday values (e.g., worker subtypes) map to external values (e.g., " S " , " R " , " C " , " U " ). If no specific mapping exists for a value, we need to set a default value of " U " for any unmatched subtypes, as specified.
This mapping is configured in the integration system’s " Integration Mapping " or " Field Mapping " settings, depending on the template. For the Core Connector: Job Postings, we typically use the " Integration Mapping " feature to handle data transformations, including setting default values for unmapped data.
2. Output File Name Format
The vendor requires the output file to be named " CC_Job_Postings_dd-mm-yy_#.xml " , where:
" CC_Job_Postings " is a static prefix,
" dd-mm-yy " represents the current date at runtime (day, month, last two digits of the year),
" # " is the current value from a sequence generator (sequencer) at runtime.
In Workday, file names for integrations are configured in the " File Utility " or " File Output " settings of the integration. To achieve this format:
The date portion ( " dd-mm-yy " ) can be dynamically generated using Workday’s date functions or runtime variables, often configured in the File Utility’s " Filename " field with a " Determine Value at Runtime " setting.
The sequence number ( " # " ) requires a sequence generator, which is enabled and configured to provide a unique incrementing number for each file. Workday uses the " Sequence Generator " feature for this purpose, typically accessed via the " Create ID Definition / Sequence Generator " task.
The Core Connector: Job Postings template supports these configurations, allowing us to set filename patterns in the integration’s setup.
Evaluating Each Option
Let’s analyze each option step by step, ensuring alignment with Workday Pro Integrations best practices and the vendor’s requirements.
Option A:
• Enable the Sequence Generator Field Attribute
• Configure the Sequence Generator
• Configure the Worker Sub Type Integration Mapping leaving the default value blank
Analysis:
Sequence Generator Configuration: Enabling the " Sequence Generator Field Attribute " and configuring the sequence generator is partially correct for the file name’s " # " (sequencer) requirement. However, " Sequence Generator Field Attribute " is not a standard term in Workday; it might refer to enabling a sequence generator in a field mapping, but this is unclear and likely incorrect. Sequence generators are typically enabled as an " Integration Service " or configured in the File Utility, not as a field attribute.
Worker Subtype Mapping: Configuring the worker subtype integration mapping but leaving the default value blank is problematic. The vendor requires any unmapped value to be " U, " so leaving it blank would result in missing or null values, failing to meet the requirement.
Date in Filename: This option doesn’t mention configuring the date ( " dd-mm-yy " ) in the filename, which is critical for the " CC_Job_Postings_dd-mm-yy_#.xml " format.
Conclusion: This option is incomplete and incorrect because it doesn’t address the default " U " for unmapped subtypes and lacks date configuration for the filename.
Option B:
• Enable the Integration Mapping Field Attribute
• Configure the Worker Sub Type Integration Mapping leaving the default value blank
• Configure the Sequence Generator
Analysis:
Sequence Generator Configuration: Configuring the sequence generator addresses the " # " (sequencer) in the filename, which is correct for the file name requirement.
Worker Subtype Mapping: Similar to Option A, leaving the default value blank for the worker subtype mapping fails to meet the vendor’s requirement for " U " as the default for unmapped values. This would result in errors or null outputs, which is unacceptable.
Date in Filename: Like Option A, there’s no mention of configuring the date ( " dd-mm-yy " ) in the filename, making this incomplete for the full file name format.
Integration Mapping Field Attribute: This term is ambiguous. Workday uses " Integration Mapping " or " Field Mapping " for data transformations, but " Field Attribute " isn’t standard for enabling mappings. This suggests a misunderstanding of Workday’s configuration.
Conclusion: This option is incomplete and incorrect due to the missing default " U " for worker subtypes and lack of date configuration for the filename.
Option C:
• Enable the Integration Mapping Integration Service
• Configure the Worker Sub Type Integration Mapping and include a default value of " U "
• Configure the Sequence Generator
Analysis:
Sequence Generator Configuration: Configuring the sequence generator is correct for the " # " (sequencer) in the filename, addressing part of the file name requirement.
Worker Subtype Mapping: Including a default value of " U " for the worker subtype mapping aligns perfectly with the vendor’s requirement for any unmapped value to be " U. " This is a strong point.
Date in Filename: This option doesn’t mention configuring the date ( " dd-mm-yy " ) in the filename, which is essential for the " CC_Job_Postings_dd-mm-yy_#.xml " format. Without this, the file name requirement isn’t fully met.
Integration Mapping Integration Service: Enabling the " Integration Mapping Integration Service " is vague. Workday doesn’t use this exact term; instead, integration mappings are part of the integration setup, not a separate service. This phrasing suggests confusion or misalignment with Workday terminology.
Conclusion: This option is partially correct (worker subtype mapping) but incomplete due to the missing date configuration for the filename and unclear terminology.
Option D:
• Enable the Sequence Generator Integration Service
• Configure the Sequence Generator
• Configure the Worker Sub Type Integration Mapping and include a default value of " U "
Analysis:
Sequence Generator Configuration: Enabling the " Sequence Generator Integration Service " and configuring the sequence generator addresses the " # " (sequencer) in the filename. While " Sequence Generator Integration Service " isn’t a standard term, it likely refers to enabling and configuring the sequence generator functionality, which is correct. In Workday, this is done via the " Create ID Definition / Sequence Generator " task and linked in the File Utility.
Worker Subtype Mapping: Configuring the worker subtype integration mapping with a default value of " U " meets the vendor’s requirement for any unmapped value, ensuring " S, " " R, " " C, " or " U " is output as specified in the table. This is accurate and aligns with Workday’s integration mapping capabilities.
Date in Filename: Although not explicitly mentioned in the steps, Workday’s Core Connector: Job Postings template and File Utility allow configuring the filename pattern, including dynamic date values ( " dd-mm-yy " ). The filename " CC_Job_Postings_dd-mm-yy_#.xml " can be set in the File Utility’s " Filename " field with " Determine Value at Runtime, " using date functions and the sequence generator. This is a standard practice and implied in the configuration, making this option complete.
Conclusion: This option fully addresses both requirements: worker subtype mapping with " U " as the default and the file name format using the sequence generator and date. The terminology ( " Sequence Generator Integration Service " ) is slightly non-standard but interpretable as enabling/configuring the sequence generator, which is correct in context.
Final Verification
To confirm, let’s summarize the steps for Option D and ensure alignment with Workday Pro Integrations:
Enable the Sequence Generator Integration Service: This likely means enabling and configuring the sequence generator via the " Create ID Definition / Sequence Generator " task, then linking it to the File Utility for the " # " in the filename.
Configure the Sequence Generator: Set up the sequence generator to provide incremental numbers, ensuring each file has a unique " # " value.
Configure the Worker Sub Type Integration Mapping with a default value of " U " : Use the integration mapping to map Internal Seasonal (Fixed) to " S, " Regular to " R, " Contractor to " C, " Consultant to " C, " and set " U " as the default for any other value. This is done in the integration’s mapping configuration.
Filename Configuration (Implied): In the File Utility, set the filename to " CC_Job_Postings_dd-mm-yy_#.xml, " where " dd-mm-yy " uses Workday’s date functions (e.g., %d-%m-%y) and " # " links to the sequence generator.
This matches Workday’s documentation and practices for the Core Connector: Job Postings template, ensuring both requirements are met.
Why Not the Other Options?
Options A and B fail because they leave the default worker subtype value blank, not meeting the " U " requirement.
Option C fails due to missing date configuration for the filename and unclear terminology ( " Integration Mapping Integration Service " ).
Option D is the only one that fully addresses both the worker subtype mapping (with " U " default) and implies the filename configuration, even if the date setup isn’t explicitly listed (it’s standard in Workday).
Supporting Documentation
The reasoning is based on Workday Pro Integrations best practices, including:
Workday Tutorial: Activity Creating Unique Filenames from EIB-Out Integrations – Details on using sequence generators for filenames.
Workday Tutorial: EIB Features – Explains integration mappings and default values.
Get_Sequence_Generators Operation Details – Workday API documentation on sequence generators.
Workday Advanced Studio Tutorial – Covers Core Connector templates and file name configurations.
r/workday Reddit Post: How to Create a New Sequence Generator for Filename for EIB – Community insights on sequence generators.
After configuring domain security policies, what task must you run to ensure the most recent changes go into effect?
Activate Previous Security Timestamp
Activate All Pending Authentication Policy Changes
Activate Pending Security Policy Changes
Activate Metadata Schedule
Whenever changes are made to domain security policies, they remain in a pending state until you explicitly activate them by running the:
Activate Pending Security Policy Changes task.
This ensures that all updates to permissions are applied across the tenant for real-time enforcement.
Why the others are incorrect:
A. Activate Previous Security Timestamp reverts to a prior configuration.
B. Activate All Pending Authentication Policy Changes is only for authentication rules.
D. Activate Metadata Schedule applies to metadata changes, not security.
Refer to the following scenario to answer the question below.
You have been asked to build an integration using the Core Connector: Worker template and should leverage the Data Initialization Service (DIS). The integration will be used to export a full file (no change detection) for employees only and will include personal data.
What configuration is required to ensure that when outputting phone number only the home phone number is included in the output?
Configure an integration map to map the phone type.
Include the phone type integration field attribute.
Configure the phone type integration attribute.
Configure an integration field override to include phone type.
The scenario involves a Core Connector: Worker integration using DIS to export a full file of employee personal data, with the requirement to output only the home phone number when including phone data. Workday’s " Phone Number " field is multi-instance, meaning a worker can have multiple phone types (e.g., Home, Work, Mobile). Let’s determine the configuration:
Requirement:Filter the multi-instance " Phone Number " field to include only the " Home " phone number in the output file. This involves specifying which instance of the phone data to extract.
Integration Field Attributes:In Core Connectors, Integration Field Attributes allow you to refine how multi-instance fields are handled in the output. For the " Phone Number " field, you can set an attribute like " Phone Type " to " Home " to ensure only home phone numbers are included. This is a field-level configuration that filters instances without requiring a calculated field or override.
Option Analysis:
A. Configure an integration map to map the phone type: Incorrect. Integration Maps transform field values (e.g., " United States " to " USA " ), not filter multi-instance data like selecting a specific phone type.
B. Include the phone type integration field attribute: Correct. This configures the " Phone Number " field to output only instances where the phone type is " Home, " directly meeting the requirement.
C. Configure the phone type integration attribute: Incorrect. " Integration attribute " refers to integration-level settings (e.g., file format), not field-specific configurations. The correct term is " integration field attribute. "
D. Configure an integration field override to include phone type: Incorrect. Integration Field Overrides are used to replace a field’s value with a calculated field or custom value, not to filter multi-instance data like phone type.
Implementation:
Edit the Core Connector: Worker integration.
Navigate to the Integration Field Attributes section for the " Phone Number " field.
Set the " Phone Type " attribute to " Home " (or equivalent reference ID for Home phone).
Test the output file to confirm only home phone numbers are included.
References from Workday Pro Integrations Study Guide:
Core Connectors & Document Transformation: Section on " Integration Field Attributes " explains filtering multi-instance fields like phone numbers by type.
Integration System Fundamentals: Notes how Core Connectors handle multi-instance data with field-level attributes.