To configure the storage for the Citrix-based VDI, you can follow these steps:
Log in to Prism Central using the credentials provided.
Go to Storage > Storage Pools and click on Create Storage Pool.
Enter a name for the new storage pool, such as VDI_Storage_Pool, and select the disks to include in the pool. You can choose any combination of SSDs and HDDs, but for optimal performance, you may prefer to use more SSDs than HDDs.
Click Save to create the storage pool.
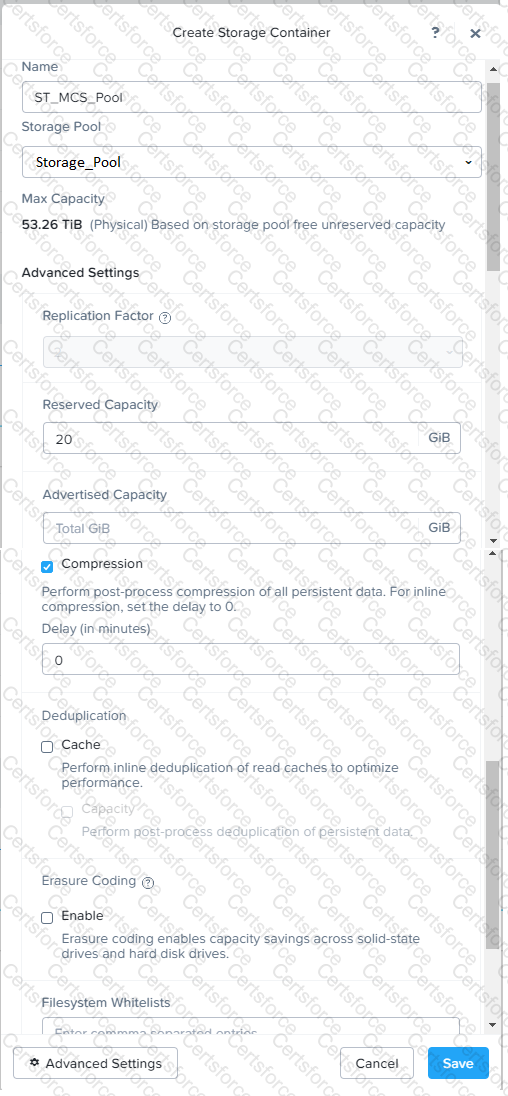
Go to Storage > Containers and click on Create Container.
Enter a name for the new container for the non-persistent pool, such as MCS_Pool_Container, and select the storage pool that you just created, VDI_Storage_Pool, as the source.
Under Advanced Settings, enable Deduplication and Compression to reduce the storage footprint of the non-persistent desktops. You can also enable Erasure Coding if you have enough nodes in your cluster and want to save more space. These settings will help you optimize the storage capacity for the non-persistent pool.
Click Save to create the container.
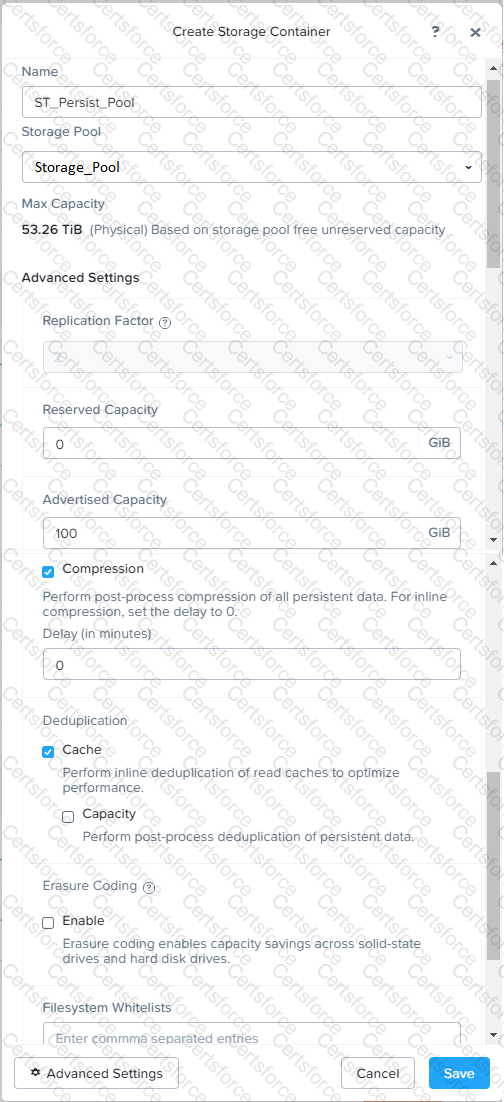
Go to Storage > Containers and click on Create Container again.
Enter a name for the new container for the persistent pool, such as Persist_Pool_Container, and select the same storage pool, VDI_Storage_Pool, as the source.
Under Advanced Settings, enable Capacity Reservation and enter 20 GiB as the reserved capacity. This will guarantee that 20 GiB of space is always available for the persistent desktops. You can also enter 100 GiB as the advertised capacity to limit the maximum space that this container can use. These settings will help you control the storage allocation for the persistent pool.
Click Save to create the container.
Go to Storage > Datastores and click on Create Datastore.
Enter a name for the new datastore for the non-persistent pool, such as MCS_Pool_Datastore, and select NFS as the datastore type. Select the container that you just created, MCS_Pool_Container, as the source.
Click Save to create the datastore.
Go to Storage > Datastores and click on Create Datastore again.
Enter a name for the new datastore for the persistent pool, such as Persist_Pool_Datastore, and select NFS as the datastore type. Select the container that you just created, Persist_Pool_Container, as the source.
Click Save to create the datastore.
The datastores will be automatically mounted on all nodes in the cluster. You can verify this by going to Storage > Datastores and clicking on each datastore. You should see all nodes listed under Hosts.
You can now use Citrix Studio to create your VDI pools using MCS or full clones on these datastores. For more information on how to use Citrix Studio with Nutanix Acropolis, seeCitrix Virtual Apps and Desktops on NutanixorNutanix virtualization environments.
https://portal.nutanix.com/page/documents/solutions/details?targetId=BP-2079-Citrix-Virtual-Apps-and-Desktops:bp-nutanix-storage-configuration.html
Submit