In a class extended PreferenceFragmentCompat. What method is used to inflate the given XML resource and add the preference hierarchy to the current preference hierarchy?
As an example. Our MutableLiveData
The easiest way of adding menu items (to specify the options menu for an activity) is inflating an XML file into the Menu via MenuInflater. With menu_main.xml we can do it in this way:
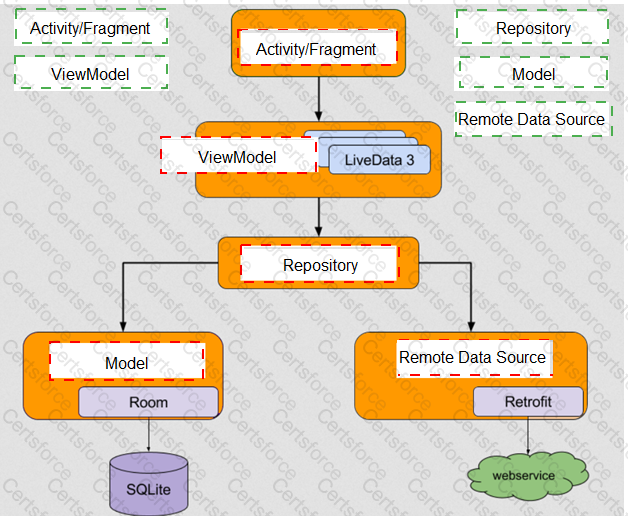
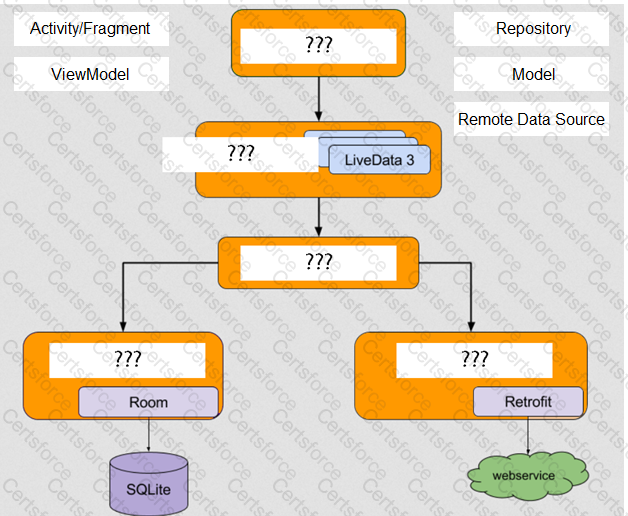
With recommended app architecture. Fill the following diagram, which shows how all the modules usually should interact with one another after designing the app (drag modules to correct places).
To run a debuggable build variant you must use a build variant that includes
About queries in DAO classes. Room verifies the return value of the query such that if the name of the field in the returned object doesn't match the corresponding column names in the query response, Room alerts you in one of the following two ways: (Choose two.)
An example. In our ViewModelFactory (that implements ViewModelProvider.Factory) we have an instance of our Repository, named mRepository. Our ViewModel has such constructor:
class MyViewModel(private val mRepository: MyRepository) : ViewModel() ...
Next, in our ViewModelFactory create ViewModel method (overriden) looks like this:
override fun
return try {
//MISSED RETURN VALUE HERE”
} catch (e: InstantiationException) {
throw RuntimeException("Cannot create an instance of $modelClass", e)
} catch (e: IllegalAccessException) {
throw RuntimeException("Cannot create an instance of $modelClass", e)
} catch (e: NoSuchMethodException) {
throw RuntimeException("Cannot create an instance of $modelClass", e)
} catch (e: InvocationTargetException) {
throw RuntimeException("Cannot create an instance of $modelClass", e)
}
}
What should we write instead of “//MISSED RETURN VALUE HERE”?
If you want the Database Inspector to automatically update the data it presents as you interact with your running app, check the Live updates checkbox at the top of the inspector window. While live updates are enabled, what happens with the table in the inspector window?
To run your local unit tests, follow these steps:
1.Be sure your project is synchronized with Gradle by clicking Sync Project in the toolbar.
2.Run your test in one of the following ways (select possible): (Choose three.)
Enable debugging on your device: If you are using the emulator, this is enabled by default. But for a connected device, you need to