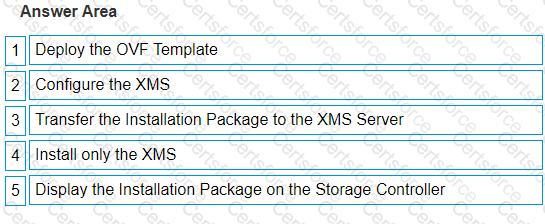
The correct sequence of steps to install a virtual XMS prior to creating the cluster on an XtremIO X2 is:
Deploy the OVF Template
Configure the XMS
Transfer the Installation Package to the XMS Server
Install only the XMS
Display the Installation Package on the Storage Controller
Deploy the OVF Template: Begin by deploying the Open Virtualization Format (OVF) template which is a pre-configured virtual machine that contains all necessary installation files.
Configure the XMS: After deployment, configure XtremIO Management Server (XMS) which involves setting up network configurations and other system settings.
Transfer the Installation Package to the XMS Server: The next step is transferring all necessary installation files for XtremIO to your newly configured XMS server.
Install only the XMS: Proceed with installing only XtremIO Management Server software on your server.
Display the Installation Package on Storage Controller: Finally, ensure that your storage controller can access and display all relevant installation packages for further processes.
These steps are outlined in the Dell XtremIO Maintenance Achievement document and provide a systematic approach to installing a virtual XMS, which is essential for managing and creating an XtremIO X2 cluster.
Contribute your Thoughts:
Chosen Answer:
This is a voting comment (?). You can switch to a simple comment. It is better to Upvote an existing comment if you don't have anything to add.


Submit